


Decorating for the holidays is daunting. What if you simplified the process? Instead of heading to the store and buying something for each season and holiday, buy once and reuse your materials. Even better, go outside for your materials and use what is in nature. Combine that with a few art supplies, plus some creativity, and you can make your decor last through the winter.
Don’t believe me? I was skeptical, too, especially since I’m one of the worst DIYers on the planet. This is where I find an expert — and quick. We consulted Lee W. Robinson of Louisville’s The Lee W. Robinson Company, who rattled off a plethora of ideas right out of the gate. He started by using all of the beautiful pumpkins we bought at Halloween. We are going to use, reuse, decorate and paint these pumpkins in four variations to use throughout the fall and winter. Read on to see Lee’s ideas for these projects.
Here’s what you’ll need:
- Pumpkins, mini and regular size
- Fresh fruit: apples, lemons, limes
- Pine cones
- Magnolia leaves
- Fresh greenery, either pine or holly
- Twigs
- Spray paint in silver or gold
- Dowel rods
- Gold wired ribbon
- Floral wire
Project One: Pumpkin Topiaries
It’s a shame to throw away all the plentiful pumpkins purchased for Halloween. Pair your mini pumpkins together in groups of two to make a pumpkin topiary that you can display on your mantel or anywhere around your house.
Materials
- 2 mini pumpkins
- Dowel rods
- Vase
- Gold wired ribbon
- Wire or pipe cleaners
- Greenery
Snap off the stem of one pumpkin and place two to four thin dowel rods or one large dowel rod through the center. Leave about three to four inches of rod and then place the other pumpkin on the top. Place down in a vase to stabilize. Using the gold ribbon, fashion your own bow by wrapping it three or four times and then securing in the middle with the wire. Fluff the bow with your hands. Snip off another piece of ribbon, about 12 inches worth, and create a tail for the ribbon, securing it in the center. Place this bow in the center of the two pumpkins, directly on the dowel rod to hide it. Place greenery around the base of the topiaries.


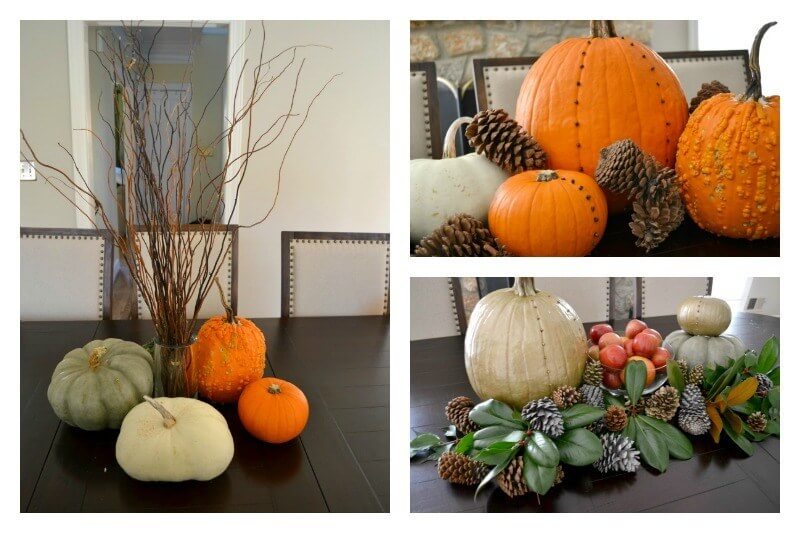
Project Two: Simple Fall Table
There’s almost a month between Halloween and Thanksgiving. For that month, keep all the uncarved pumpkins you bought for Halloween and put them on your dining room table. They make a great centerpiece that requires absolutely no maintenance and makes a big visual impact in a room.
Materials
- Three to five pumpkins of various sizes, colors and textures
- Glass vase
- Twigs
Place a large number of thin twigs of varying form in a glass vase in the center of your table. Around the vase, simply arrange different pumpkins and gourds of different heights and colors. This arrangement will easily last all month.


Project Three: Simple Thanksgiving Table
With just a couple of additions to your fall table, you can make a Thanksgiving meal table. Because you will be eating at the table, it is important to get rid of the tall centerpiece, so that you will be able to have a conversation and see your guests. Take the twigs out of the vase and lay them down the length of the table. Everyone at the table should enjoy the centerpiece this way. Also, Lee believes this is preferable to a cloth table runner, as it shows items from nature and seems less contrived. The difference in these tables is the addition of pine cones and cloves to the pumpkins. The table will be so aromatic, in addition to the wonderful smells of your turkey dinner.
Materials
- Same pumpkins and gourds from fall table
- Cloves
- Twigs
- Pine cones
Using your same pumpkins from the fall table, pick out a couple and line them with cloves. Using the pumpkin’s natural lines as your guide, place the cloves in a straight line vertically down your pumpkin. Lee does not recommend doing too many lines of cloves; less is definitely more here. We placed cloves in one big and one little pumpkin.
Remove your twigs from the vase and place down the length of your table. This is meant to act as a table runner, as well, so stretching it out is ideal. Place your largest pumpkin in the middle and arrange the other pumpkins around it. Scattered throughout, add pine cones to create texture. You can use additional pine cones as place card holders.


Project Four: Simple Holiday and Winter Table
Add fresh fruit (or faux) to turn the Thanksgiving table into a holiday and winter table. Pumpkins and pine cones are still in play at this holiday table, but on this round, they have been painted metallic for a more “holiday” or “winter wonderland” feel. Add greenery that is synonymous with the holidays, such as magnolia, holly and pine, for a fragrant organic addition to the table.
Materials
- Same pumpkins from Thanksgiving table
- Magnolia
- Fresh greenery with berries, such as holly
- Fresh apples (can also use pineapples, lemons, limes or oranges)
- Gold or silver spray paint
- Same pine cones from Thanksgiving table
- Optional use of twigs from Thanksgiving table
Take a few of your pumpkins from the Thanksgiving table and spray paint them gold. We used the cloved pumpkins, and the effect was dramatic. The cloves looked like nail-head studs after painting. Also, take a handful of the pine cones and spray paint them in metallic color, as well. Snip off fresh sprays of greenery. Purchase fresh apples or the fruit of your choice and place it in a bowl in the center of the table. Surround it with spray-painted pumpkins. We used the gray and green pumpkins, as well, that were unpainted. Arrange greenery and pine cones around the bigger pieces.


This DIY project is perfect for rookies, because it takes very little craftsmanship and effort. By simply using materials you already have, and materials from nature, you have saved precious time and money.
Enjoy the season!
Thank you to Lee W. Robinson for all of his advice and confidence that we could manage this project on our own. The Lee W. Robinson Company is located in Louisville, Kentucky and can be reached by calling 502-895-1401 or visiting their website www.leewrobinson.com.