For a busy family of five, the kitchen of this 1950s home wasn’t merely a spot for cooking. It was a formal dining room, breakfast nook, family room, storage area, homework hub and party venue. And when kitchen designer Karen Kassen first viewed it, the room was also a bit dark and cluttered, with a flow that wasn’t ideal for its myriad uses.
All Karen could see, though, was potential.
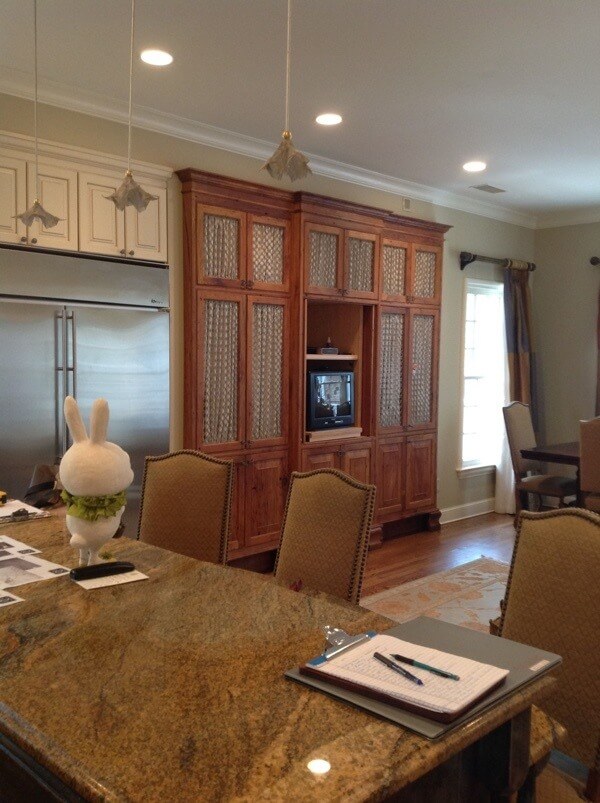
“In a space that has to function in so many different ways, every little inch has to be considered,” says Karen, a certified master kitchen and bath designer and co-owner of Kitchens Unlimited. She eyed the room’s key elements — which included cream-painted, French country-style cabinets, a colossal, dark-stained, built-in media cabinet and a large, stainless steel refrigerator — and replaced them with a vision of a light, bright and streamlined space that would function optimally for her clients, the Barton family.
“Her first question to me was, ‘What do you do in this space?’” says homeowner Alison Barton of Karen. “And I looked at her and said, ‘Everything.’”
Working within the family’s budget and the room’s existing footprint, Karen crafted a plan for a kitchen that would bring the room’s functions — and the family — together in a way that wasn’t possible in the original space. Here, learn her six tips for creating a multifunctional family kitchen.
PinBEFORE: The original kitchenPinAFTER: A bright, cheery, beautiful kitchen that encourages interaction and conversation
1. Create a flex space.
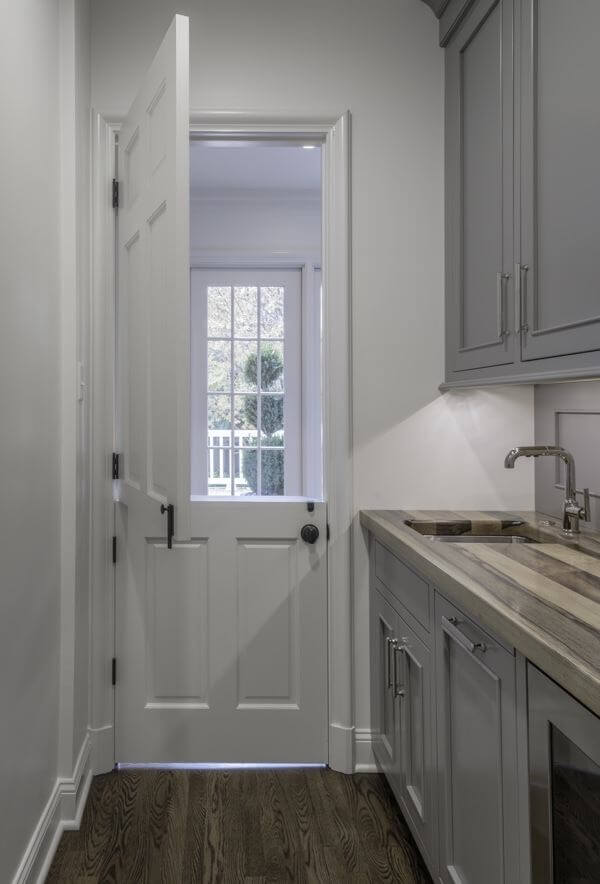
Current trends in space planning seemed to point in the direction of blowing out walls and using the square footage from an existing pantry to expand the kitchen and open it to the rest of the house. However, Karen saw a better solution. The kitchen was already open to the family and dining rooms. But it lacked a space that could offer extra storage and serve as a prep area for the family’s many get-togethers. And so Karen turned that formerly dark, dead-end space into a jewel box of a butler’s pantry.
With hardwood floors, gray cabinetry and a stunning Saxon Wood countertop with a durable finish, this flexible room has turned out to be a game-changer for the Bartons. Along with added cabinetry, it has a second dishwasher and small, built-in beverage refrigerators. “The functionality of the kitchen allows us to stay in here and enjoy each others’ time a whole lot more,” Alison says. “We’re seeing that it’s just easy, and we love it.”
PinBEFORE: The old pantry was a dark, dead-end space.PinAFTER: This butler’s pantry provides additional storage and prep space, as well as beverage coolers and an additional sink and dishwasher.
2. Find unique solutions that fit the unique space.
Interior designer Gwen Driscoll, who designed the attached family room and other spaces in the home, suggested a Dutch door between the new butler’s pantry and the rear hallway, which opens to a back deck. That single touch means the space can be completely closed off to hide messy prep work during a party, or left “half open” for serving guests.
“It was so perfect,” Karen says. “Perfect for the age and style of the house.”
“And for our quirkiness,” adds Alison.
The former kitchen contained two other small, compartmentalized spaces that offered a challenge for Karen to solve. Near the old walk-in pantry were a utility closet and a tiny room Alison was using as an office. “We looked at how we could make that space better and make it into one room that could tackle the overflow from the old pantry,” Karen says. “That just opened up a lot of extra function for the basic kitchen.”
PinThe Dutch door between the new butler’s pantry and the rear hallway opens to a back deck. That single touch means the space can be completely closed off to hide messy prep work during a party, or left “half open” for serving guests.
3. Place items at their point of use.
That new utility space contains pantry shelves for bulk storage. But for ultimate convenience, Karen also added pantry storage next to the integrated fridge. “Another thing I really like to do in a kitchen is to create a pantry space that has your cold and frozen storage, but also has your dry storage for pantry goods in the same area,” Karen says. “So a lot of stuff Alison uses on a daily basis that was in the old, traditional pantry, we moved here.” The refrigerator, which is paneled in the same white finish as the kitchen cabinetry, features three refrigeration compartments, two freezer compartments and one large pantry cabinet that’s integrated into the design. “That’s my breakfast grab and quick lunch,” Alison says.
PinBEFORE: The old refrigerator was huge.PinAFTER: To the left of the gray media center, the new fridge is more space-smart, and the pantry is conveniently located right next to it. Both seamlessly integrate into the design, while offering immense functionality.
4. Recognize that bigger is not always better.
“I think the kitchen itself doesn’t have to be a huge space to be functional,” Karen says. “And I think, in turn, sometimes a kitchen can be too large.” By using the nooks and crannies of the former, quirky space in purposeful ways that match how the family uses the room, she adds, “it helps the kitchen feel bigger than it is.”
RELATED: 5 Expert Design Tips for Creating a Tasteful, Kid-Friendly Home
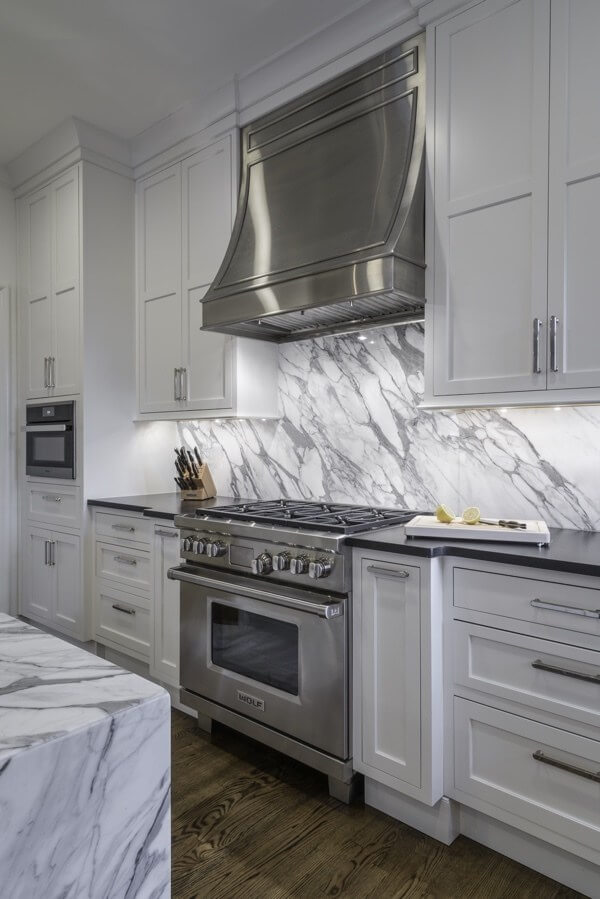
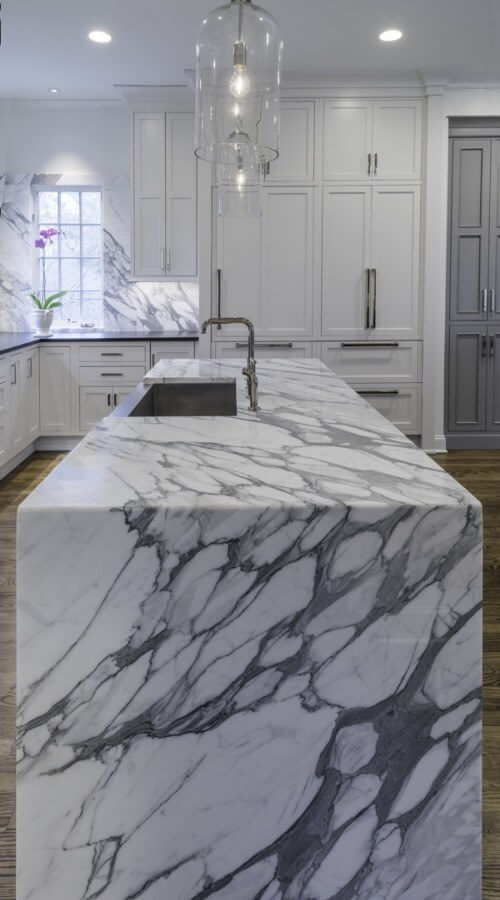
Karen applied the same “better, not bigger” philosophy to the island. The old island was tiered, and it was also wider than the new, single-level kitchen island. Karen shaved inches from its width to broaden the space between the new stainless steel apron sink – which she moved from the corner of the room to the island so the cook can interact more easily with family and guests – and the Wolf range, improving flow in the work triangle. Those mere inches make the space easier to use by yards, Alison says.
Pin
5. Maximize the budget with one blow-out focal point.
As soon as Karen and Alison laid eyes on the slab of Calacatta Gold marble that would become the Bartons’ island countertop and backsplash, they were sold. “My supplier had put some marble on hold for us sight-unseen,” Karen says. “We all met one morning to go look. Normally that process can be very painstaking, with multiple trips to multiple places.” Within 20 minutes, though, Alison had approved and purchased the marble. Karen designed the island with a waterfall edge to achieve the sleek, modern and updated feel the Bartons were after. “It just kind of pulled the whole room together,” Karen says. “That’s why we decided to take it up the walls, because it was just so special.”
On the remaining countertops, Karen chose an absolute black granite in a “leathered” finish for added durability. In the same vein, she suggested that Alison use two different cabinet door styles — an upgraded door Alison loved for the new entertainment built-in that bridges the kitchen and family room, and a more budget-conscious, but still high-quality, option for the remaining cabinetry, which extends to the ceiling for maximum storage. “That way she got the best of both worlds,” Karen says.
PinBEFORE: The center island was fine, but a bit too close to the cooktop. Also, the kitchen sink was located in the corner, and the cabinets were infringed on by the soffit.PinAFTER: The Calacatta Gold marble definitely brings the WOW factor to this beautiful kitchen. Note the new sink location, as well as the heightened cabinetry.
6. Find the right professional(s) for the job.
Alison and her husband, Jim, were already working with Gwen Driscoll on their home’s renovation. It was Gwen who suggested the family add Kitchens Unlimited to the project team. “Kitchen design is a highly specialized field,” Gwen says. “It’s a great collaboration and allows me to focus on the interior design master planning for the whole project, integrating the kitchen but also beyond that, as well.”
Gwen selected colors for the kitchen and designed the surrounding spaces. Karen and her design assistant, Jacquelyn Sappenfield, designed the kitchen itself. Because Kitchens Unlimited doesn’t charge a design fee if clients purchase products through the company, it didn’t add to the renovation’s overall cost. But it added worlds in terms of function and specialized expertise. “It was so nice to bring in someone who does this on a professional basis,” Alison says. “They knew what may or may not work, and they came up with some ideas that I would never have thought of.”
Now that her family’s new kitchen is in daily use, Alison marvels regularly at how family-friendly the space is. “You have to break some habits and relearn where you’ve placed things,” she says. “But once you get used to the new location, it’s like, ‘Goodness, why didn’t we do this before?’”
Thank you to Chip Pankey for today’s beautiful photos.Check out our “Home & Decor” section and be inspired by even more local homes. And find local providers to make your dreams come true by downloading the SB App. It’s free!
Our unofficial motto at StyleBlueprint is "Be kind. Do good." We encourage this to be the basis for all comments on our articles. Provide feedback that adds to the story. Some controversy or disagreements are part of any good dialogue between friends, but anything that tears down or belittles others is subject to disapproval or removal. Thank you for being a member of the StyleBlueprint community! View our Community Guidelines.